Introduction
Network Mapper or Nmap for short, is a network reconnaissance tool developed by Fyodor in the late 90s, and it is till date, one of the most preferred and popular network mapper today.
It is actively maintained & developed and started shipping with a GUI based scanner some time ago.
Scanning with Nmap
We’ll cover Nmap options in detail, i’ll try to explain the best I can, how it works and in which scenarios they can come handy. Along with some network traffic analysis and outputs (wherever possible!)
This series will be divided into multiple posts, so that you can gain the maximum information without feeling overwhelmed or get confused between different sections.
I. Correctly specifying targets
nmap -sn <IP_range>
nmap -iL <list>
The above two options paired together can help you scan discovered / up hosts, instead of scanning a entire subnet. However, It is important to note that the -sn option does generate a small amount of network traffic (as seen below), and pinging an entire subnet may bring out an alert on the IDS / Firewall, Threat Monitoring Tools deployed within the enterprise.
This option is viable, in the case of a white / grey box penetration test where you have a little access within the infrastructure, whilst having your traffic white-listed to avoid unnecessary “malicious” alerts. More on the evading techniques will be covered in this series.
II. Discovery 101
This section will cover the usage of some of the host discovery options available in Nmap, and why they are useful.
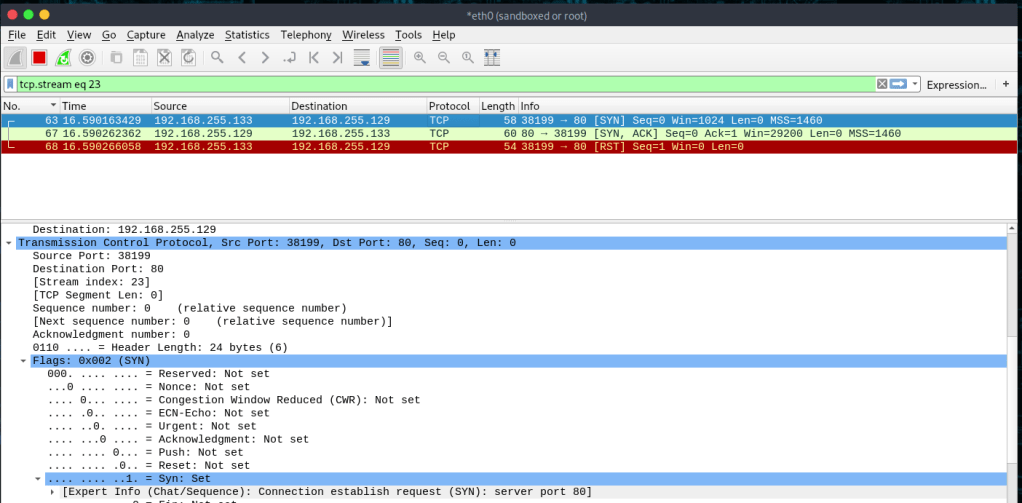
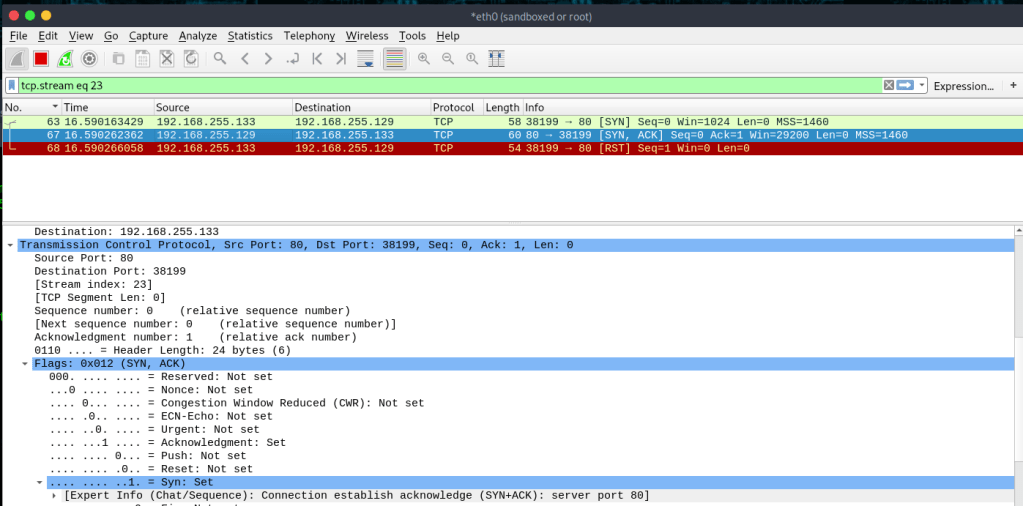
-PS
Sends an empty TCP packet with SYN Flag.
- If the destination port is closed, it sends back a RST Flag.
- If the destination port is open, it sends back a SYN/ACK Flag, upon which Nmap sends a RST flag, to break the Three-Way Handshake.
-PA
Sends an empty TCP packet with ACK Flag.
- In Stateless firewall rules, SYN packet is likely to be dropped.
- In Stateful firewall rules, ACK packet is likely to be dropped.
To resolve this ambiguity, send both SYN and ACK by specifying -PS and -PA together.
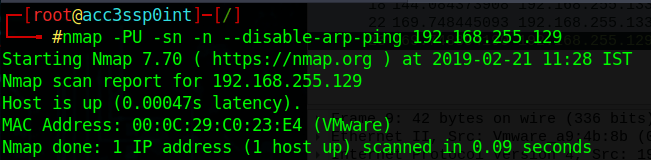
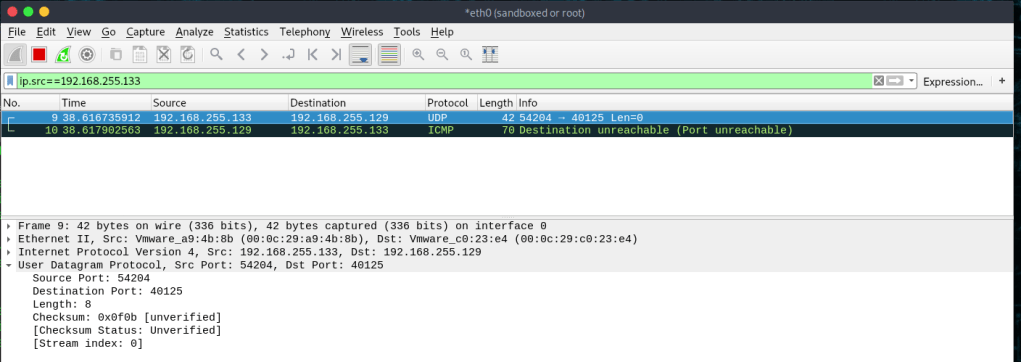
-PU
Performs host discovery via UDP ping. Sends an empty UDP packet.
- Packets are usually empty, but that can be configured using options as given: –data, –data-string, –data-length.
- Uses a default port 40125 to perform the scan.
- Error messages, lack of response, and response to empty UDP packets will disclose the state of the target in most cases.
The primary advantage of this scan type is that it bypasses firewalls and filters that only screen TCP packets.
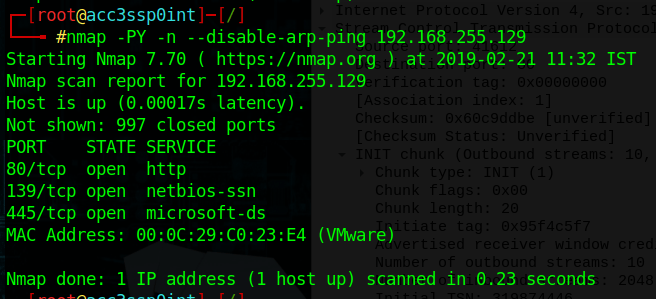
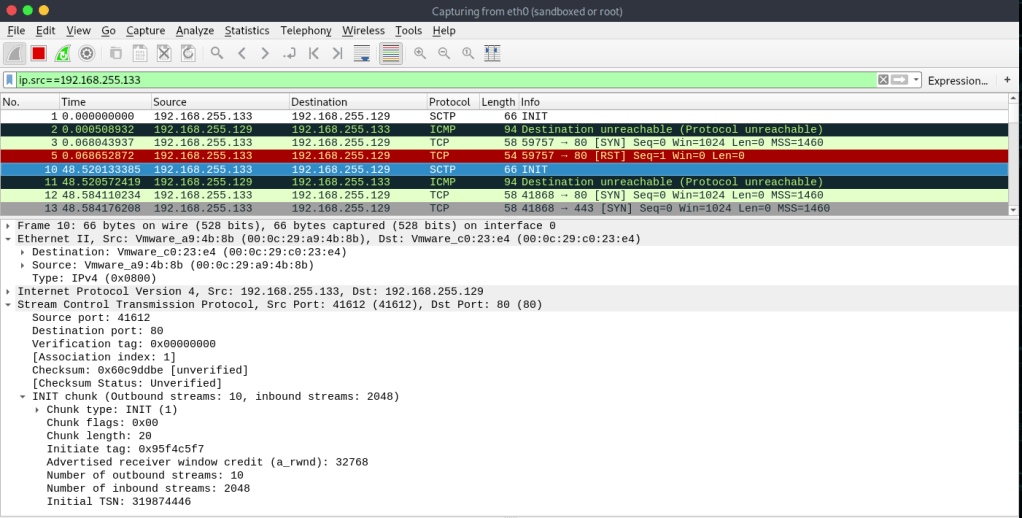
-PY
Sends a SCTP packet with a minimal INIT chunk.
- If the destination port is closed, an ABORT packet is received.
- If the destination port is open, it replies with an INIT-ACK packet, upon which Nmap sends an ABORT packet to terminate the connection.
SCTP enabled machines are typically Telecom oriented devices,
carrying SS7 and SIGTRAN over IP.
-PE; -PP; -PM
Sends different ICMP type requests to discover hosts.
In the case where ICMP echo type 8 (echo request) & 0 (echo reply) have been disabled by the administrator (generic ping function) , -PP & -PM comes handy.
A timestamp request & reply (PP – ICMP code 13 & 14) and / or an address mask request & reply (PM – ICMP code 17 & 18) can disclose if the host is available, unfortunately, I could not get address mask request-reply to work.
Note: Option -PE is the default echo request-reply combo (code 8 & 0).


-PO
One of the newer host discovery options is the IP protocol ping, which sends IP packets with the specified protocol number set in their IP header. However, to configure this, DEFAULT_PROTO_PROBE_PORT_SPEC in nmap.h, must be modified prior to compile.
-PY
Uses ARP packets to scan a local network.
Nmap uses ARP instead of other options, even if specified when scanning a LAN as it is faster and more reliable. To disable ARP scanning completely the option –disable-arp-ping may be used.


-n / -R
-n Is used to disable DNS resolution.
-R Is used to always resolve DNS for supplied IP address.
–dns-server <dns_server_ip>
Allows you to specify your own DNS server, instead of using the one available in resolv.conf (Linux/UNIX) or Registry (windows).
This type of scan comes in handy when scanning private networks, as the rDNS fails to work in most cases. In this case, your approach would be to sweep the network for a DNS server (open port 53) and specify this to resolve the available hosts in the network.
Note: This option might not be honored if the DNS response exceeds the size of a UDP packet. In such a situation our DNS resolver will make the best effort to extract a response from the truncated packet, and if not successful it will fall back to using the system resolver. Also, responses that contain CNAME aliases will fall back to the system resolver.
Until Next Time…
Stay tuned for other parts of this series. See you soon! Feel free to reach out. 🙂
References:
https://nmap.org/book/man.html

Leave a comment